An ice maker is essential to many homes, especially during the summer, and having it suddenly stop making ice can be a hassle.
The GE profile refrigerator ice maker is proven to be reliable in many homes, but at times minor technical hitches may require you to intervene and get it running again.
If your General Electric (GE) ice maker isn’t making ice as it should, there is no call for alarm. The ice maker might need to reset.
The GE refrigerator ice maker is reset by first pressing the ice and water feature on the control panel for three seconds. After that, the filter lights should turn green, and the filter status will show GOOD. Once this is clear, you can go ahead to restart your ice maker.
How to Reset a GE Profile Refrigerator Ice Maker?
 1")
You can reset your refrigerator ice maker by following the steps listed and explained in the table below.
Most GE refrigerator ice maker issues are minor, and you can quickly resolve them by resetting them. However, calling for technical assistance is only a last resort.
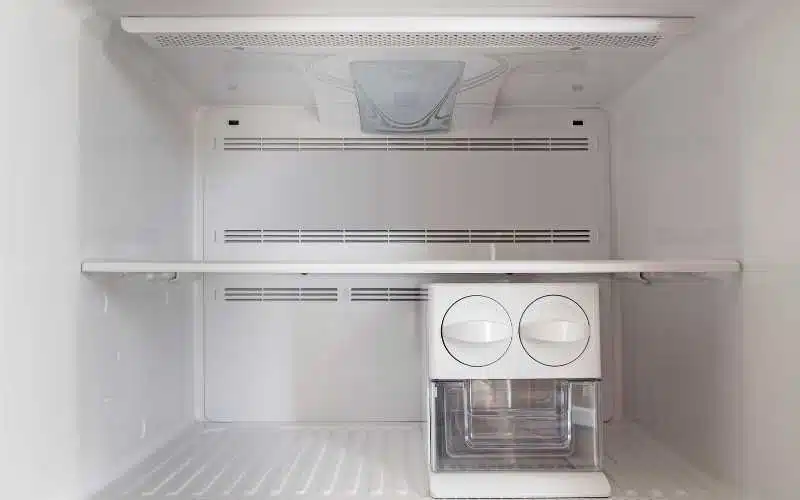
Where Is Reset Button on a GE Profile Refrigerator Ice Maker?
GE profile refrigerator ice maker does not come with a specific reset button. Still, you can reset your GE refrigerator ice maker with the steps explained in the table above.
The shut-off feature, however, of a GE refrigerator ice maker is usually located at its top.
Therefore, it is not necessarily a reset button, but it could be helpful. Push it up and down three times to trigger the reset process.
The ice maker arm also finalizes the reset process, signaling the ice maker to resume making ice again.
It can do this because the ice maker feeler has a vital function in the ice maker. It senses the ice level in the refrigerator ice maker and signals the system to keep producing ice or stop.
Why is my GE Profile Refrigerator not Making ice?
Issues like defective parts and cracks in the ice tray can stop the ice-making process in your ice maker.
While you might have to replace or repair faulty and cracked parts, problems like blocked water filters, low water pressure, and temperature are easy to fix.
#1. Blocked Water Filter
Check the water filter because the ice maker might stop working. After all, accumulated particles block the water filter.
It will obstruct water flow to the ice maker and cause ice production to stop. Replace your water filter every six months, but if you find out that it is blocked, you can replace it earlier.
#2. Low Water Supply
If the water line is in knots or partially blocked, it could stop water from flowing fully to the ice maker.
To check the water line, find the inlet valve at the back of the fridge and ensure there are no blockades, knots, or leaks.
If the valve is leaking, then replace it. In addition, the problem could be a result of low water pressure.
First, check the water pressure at the main shut-off valve to see if it is at least 40 psi or above. Anything below is too low a pressure for the ice maker to work with.
#3. Wrong Refrigerator Temperature
Check the temperature of your refrigerator. It should neither be too high nor too low. For example, you can set it to 0-5°F for ice production.
The ice may be small or misshapen if the refrigerator is too hot. In contrast, ice may build up, and frost will prevent ejection if it’s too cold. It would then need defrosting.
The best temperature to set your refrigerator ice maker to is 0°F, so if you set it higher than that, it could be why your ice maker is not functioning.
To resolve this, adjust the freezer temperature by locating the thermostat. Then, twist it to a lower setting.
After a few hours, the refrigerator should reach the optimal temperature, then check the ice maker to see if it is working.
How Do You Manually Cycle a GE Profile Refrigerator Ice Maker?
If your ice maker gear has a small notch, you may need a flathead screwdriver. Use the screwdriver to turn your gear anticlockwise until you hear a click.
In most cases, the click you hear will force the ice maker to cycle. A complete refrigeration cycle involves having the low-pressure liquid carried to the evaporator, where heat is exchanged and finally cools and produces ice.
Many ice makers produced in recent times take about 90 minutes to produce 10 cubes of ice.
It then cycles about 16 times a day and only stops when the ice bucket is packed and not emptied.
The feeler arm moves upward before the ice maker pushes out the ice cubes. After it ejects the cubes, the arm falls downward again.
Once they feel the arm is in its lowest resting position, it triggers a switch in the circuit, which initiates the water valve to start another cycle.
To cycle the fridge manually carries out the following:
#1. Power on Diagnostics
When you first connect the GE refrigerator ice maker to power, ensure the thermistor reads up to 50°F or above in temperature.
Afterward, the system goes through a power-on test and initiates the freeze cycle.
As the power-on test is ongoing, the ice maker controls system powers on the motor till it is in the home position. Then it does the same for the heater and the water valves for a split second each.
After which, it launches a series of verifications that include verifying that the plastic arm of the ice maker was in the appropriate position, that the motor was not in a home position and that the motor loses all power after power off.
Afterward, it proceeds to the freeze cycle. Remember that the power on the test will only add water for a split second, so it will not overwhelm the mold, but a small cube might form.
The control system will usually come on if it is below 50°F. The freeze cycle starts when the control system is in the home position.
When it is not, the central system will start the harvest cycle but divert water to stop it from going into the mold tray.
#2. Service Diagnostics
In the first few seconds that the ice maker powers on, it may enter the service diagnostic test mode.
This test starts by pushing the ice maker to feel the arm back and forth from its resting position thrice in 15 seconds. Doing this more than three times might not yield results.
Note if the ice maker has already begun a cycle to harvest ice, and the arm is already in motion.
Then, it is impossible to initiate the service mode and manually move the arm without switching it off.
Water fill comes after a harvest cycle, making up the service diagnostics mode. The refrigerator ice maker enters the harvest cycle at any temperature, with its feeler in any position.
In the harvest cycle of the service diagnostics mode, the system keeps the heater powered for 20 seconds or more before it goes off.
The first fill lasts 5.1 seconds of the water cycle while the mold is still not chilled. After that, the only water fill occurs in the service mode irrespective of the thermistor’s temperature.
After the service diagnostic test is complete, the refrigerator ice maker exits automatically and can resume its usual freeze cycles.
Conclusion
Taking proper care of your General Electric profile refrigerator ice maker is crucial.
Regular cleaning, keeping the refrigerator door closed as much as possible and removing any ice buildup once you notice it should help last up to ten years.
In certain instances, the help of a professional may be required.